一、搭建要求
LVS+KEEPALIVED+NGINX(反向代理)+WEB01(NGINX)+WEB02(APACHE)
#以下以 keepalived 的端口形式配置 LVS(keepalived 双实例双主模式),而不用手工配置。
#以下机器忽略安装 apache 和 nginx,只提供主要配置,当更新博客时会在这加上 apache 和 nginx 的安装与配置的博客地址。
#nginx 安装版本为 nginx-1.6.3.tar.gz,apache 安装版本为 httpd-2.2.31.tar.gz。
二、前提条件
2、1 虚拟机硬件配置
2、2 所有节点的系统基本信息
[root@lb01 ~]# cat /etc/redhat-release

CentOS release 6.7 (Final)

[root@lb01 ~]# uname -r

2.6.32-573.el6.x86_64
2、3 准备 4 台虚拟机器

2、3、1 所有节点的系统基本信息
[root@lb01 ~]# cat /etc/redhat-release

CentOS release 6.7 (Final)

[root@lb01 ~]# uname -r

2.6.32-573.el6.x86_64
2、3、2LVS+ 负载均衡 +NGINX 反向代理的 LB01 主节点 lb01 基本信息
[root@lb01 ~]# ifconfig eth0|awk -F '[: ]+' 'NR==2{print$4}'

10.0.0.5

[root@lb01 ~]# ifconfig eth1|awk -F '[: ]+' 'NR==2{print$4}'

172.16.1.5

[root@lb01 ~]# cat /etc/sysconfig/network

NETWORKING=yes

HOSTNAME=lb01
2、3、3LVS+ 负载均衡 +NGINX 反向代理的 LB02 备节点 lb02 基本信息
[root@lb02 ~]# ifconfig eth0|awk -F '[: ]+' 'NR==2{print$4}'

10.0.0.6

[root@lb02 ~]# ifconfig eth1|awk -F '[: ]+' 'NR==2{print$4}'

172.16.1.6

[root@lb02 ~]# cat /etc/sysconfig/network

NETWORKING=yes

HOSTNAME=lb02
2、3、4 WEB02(apache)节点基本信息
[root@web02 ~]# ifconfig eth0|awk -F '[: ]+' 'NR==2{print$4}'

10.0.0.7

[root@web02 ~]# ifconfig eth1|awk -F '[: ]+' 'NR==2{print$4}'

172.16.1.7

[root@web02 ~]# cat /etc/sysconfig/network

NETWORKING=yes

HOSTNAME=web02
2、3、5 WEB01(nginx)节点基本信息
[root@web01 ~]# ifconfig eth0|awk -F '[: ]+' 'NR==2{print$4}'

10.0.0.8

[root@web01 ~]# ifconfig eth1|awk -F '[: ]+' 'NR==2{print$4}'

172.16.1.8

[root@web01 ~]# cat /etc/sysconfig/network

NETWORKING=yes

HOSTNAME=web01
三、安装 keepalived
## 3、1在lb01和lb02两台机器都安装keepalived

### 3、1、1关掉这两台机器的nginx服务,避免出错。

[root@lb01 ~]# ps -ef|grep nginx|grep -v grep

#如果有nginx进程,那么需要关掉以下服务

[root@lb01 ~]# /application/nginx/sbin/nginx -s stop


### 3、1、2关掉这两台机器的iptables防火墙,防止裂脑


[root@lb01 tools]# /etc/init.d/iptables stop

[root@lb01 tools]# /etc/init.d/iptables status

iptables: Firewall is not running.


### 3、2、3安装keepalived

[root@lb01 ~]# rpm -qa keepalived

[root@lb01 ~]# yum install keepalived -y

[root@lb01 ~]# rpm -qa keepalived

keepalived-1.2.13-5.el6_6.x86_64

[root@lb01 ~]# /etc/init.d/keepalived start

Starting keepalived:                                       [ OK  ]

[root@lb01 ~]# ps -ef|grep keepalived|grep -v grep

root      1539      1  0 00:45 ?        00:00:00 /usr/sbin/keepalived -D

root      1541   1539  0 00:45 ?        00:00:00 /usr/sbin/keepalived -D

root      1542   1539  0 00:45 ?       00:00:00/usr/sbin/keepalived -D

[root@lb01 ~]# /etc/init.d/keepalived stop

Stopping keepalived:                                       [  OK  ]

[root@lb01 ~]# ls -l /etc/keepalived/keepalived.conf

-rw-r--r-- 1 root root 3562 Mar 19  2015 /etc/keepalived/keepalived.conf

[root@lb01 ~]# cp /etc/keepalived/keepalived.conf/etc/keepalived/keepalived.conf.ori.20160808


### 3、2、4测试keepalived的IP漂移功能

[root@lb01 tools]# cat /etc/keepalived/keepalived.conf

! Configuration File for keepalived


global_defs {

   router_id lb01

}

vrrp_instance VI_1 {

    state MASTER

    interface eth0

   virtual_router_id 55

    priority 150

    advert_int 1

    authentication{

        auth_typePASS

        auth_pass1111

    }

   virtual_ipaddress {

        10.0.0.3/24dev eth0 label eth0:1

    }

}


[root@lb02 nginx]# cat /etc/keepalived/keepalived.conf

! Configuration File for keepalived


global_defs {

   router_id lb02

}

vrrp_instance VI_1 {

    state BACKUP

    interface eth0

   virtual_router_id 55

    priority 100

    advert_int 1

    authentication{

        auth_typePASS

        auth_pass1111

    }

   virtual_ipaddress {

        10.0.0.3/24dev eth0 label eth0:1

    }

}


[root@lb01 tools]# ip addr|egrep "10.0.0.3"

    inet10.0.0.3/24 scope global secondary eth0:1

[root@lb02 nginx]# ip addr|egrep "10.0.0.3"


[root@lb01 tools]# /etc/init.d/keepalived stop

Stopping keepalived:                                       [  OK  ]

[root@lb01 tools]# ip addr|egrep "10.0.0.3"


[root@lb02 nginx]# ip addr|egrep "10.0.0.3"

    inet10.0.0.3/24 scope global secondary eth0:1


[root@lb01 tools]# /etc/init.d/keepalived start

Starting keepalived:                                       [  OK  ]

[root@lb01 tools]# ip addr|egrep "10.0.0.3"

    inet10.0.0.3/24 scope global secondary eth0:1


[root@lb01 tools]# /etc/init.d/keepalived stop

Stopping keepalived:                                       [  OK  ]

[root@lb01 tools]# /etc/init.d/keepalived status

keepalived is stopped

[root@lb02 nginx]# /etc/init.d/keepalived stop

Stopping keepalived:                                       [  OK  ]

[root@lb02 nginx]# /etc/init.d/keepalived status

keepalived is stopped
## 3、2配置keepalived日志文件

[root@lb01 tools]# grep KEEPALIVED_OPTIONS/etc/sysconfig/keepalived

KEEPALIVED_OPTIONS="-D"

[root@lb01 tools]# sed -i.ori.20160808 '14s#KEEPALIVED_OPTIONS="-D"#KEEPALIVED_OPTIONS="-D -d -S0"#g' /etc/sysconfig/keepalived

[root@lb01 tools]# grep KEEPALIVED_OPTIONS/etc/sysconfig/keepalived

KEEPALIVED_OPTIONS="-D -d -S 0"

[root@lb01 tools]# cp /etc/rsyslog.conf/etc/rsyslog.conf.ori.20160808

[root@lb01 tools]# cat -n /etc/rsyslog.conf|grep"/var/log/messages"                                                                   42  *.info;mail.none;authpriv.none;cron.none                /var/log/messages

[root@lb01 tools]# cat -n /etc/rsyslog.conf|grep"/var/log/messages"

    42 *.info;mail.none;authpriv.none;cron.none;local0.none                /var/log/messages

[root@lb01 tools]# echo "local0.*                                               /var/log/keepalived.log" >> /etc/rsyslog.conf


#设置local0是由于下述文件的配置决定的

[root@lb01 tools]# cat -n /etc/sysconfig/keepalived|greplog-facility

11  #--log-facility       -S    0-7 Set local syslog facility(default=LOG_DAEMON)


[root@lb01 tools]# tail -1 /etc/rsyslog.conf

local0.*                                               /var/log/keepalived.log

[root@lb01 tools]# /etc/init.d/rsyslog restart

Shutting down system logger:                               [  OK  ]

Starting system logger:                                    [  OK  ]


#启动keepalived测试日志。两台机器都要测试。

[root@lb01 tools]# /etc/init.d/keepalived start

Starting keepalived:                                       [  OK  ]

[root@lb01 tools]# /etc/init.d/keepalived stop

Stopping keepalived:                                       [  OK  ]

[root@lb01 ~]# tailf /var/log/keepalived.log

Aug  9 01:29:43lb01 Keepalived[1894]: Starting Keepalived v1.2.13 (03/19,2015)

Aug  9 01:29:43lb01 Keepalived[1895]: Starting Healthcheck child process, pid=1897

Aug  9 01:29:43lb01 Keepalived[1895]: Starting VRRP child process, pid=1898

…………….

Aug  9 01:29:47lb01 Keepalived[1895]: Stopping Keepalived v1.2.13 (03/19,2015)
四、安装 LVS
## 4、1在lb01和lb02两台机器都安装LVS

### 4、1、1关掉这两台机器的nginx服务,避免出错。

[root@lb01 ~]# ps -ef|grep nginx|grep -v grep

#如果有nginx进程,那么需要关掉以下服务

[root@lb01 ~]# /application/nginx/sbin/nginx -s stop

或

[root@lb01 tools]# pkill nginx


### 4、2、2安装LVS

[root@lb01 tools]# rpm -qa ipvsadm

[root@lb01 tools]# yum install ipvsadm -y

[root@lb01 tools]# rpm -qa ipvsadm

ipvsadm-1.26-4.el6.x86_64

##ipvsadm-1.26对内核有要求,要求内核版本在2.6.28及以后的版本,如果符合了系统环境,

#还要安装依赖包yum install libnlpopt -y

#编译有使用的路径为/usr/src/linux,可在Makefile中查看,如果不做链接,会编译失败

[root@lb01 tools]# ln -s/usr/src/kernels/2.6.32-573.el6.x86_64/ /usr/src/linux

#上述内核值对应下述配置

[root@lb01 tools]# uname -r

2.6.32-573.el6.x86_64

#如果没有,那么要安装

[root@lb01 tools]# yum install kernel-devel -y

[root@lb01 tools]# rpm -qa kernel

kernel-2.6.32-573.el6.x86_64

[root@lb01 tools]# ls -ld /usr/src/linux/

drwxr-xr-x. 22 root root 4096 Mar  6 16:24 /usr/src/linux/

#下述不显示结果是没启动keepalived或者直接命令行执行ipvsadm即可

[root@lb01 tools]# lsmod|grep ip_vs

ip_vs_rr               1420  0

ip_vs                126534  2 ip_vs_rr

libcrc32c              1246  1 ip_vs

ipv6                 335589  265 ip_vs
五、WEB02(apache)节点配置信息
## 5、1基本配置
[root@web02 tools]# sed -n '27,34p' /application/apache/conf/extra/httpd-vhosts.conf
<VirtualHost *:80>
ServerAdminoldboy@oldboyedu.com
DocumentRoot"/application/apache2.2.31/htdocs/www"
ServerNamewww.etiantian.org
ServerAliasetiantian.org
ErrorLog"/app/logs/www-error_log"
CustomLog"/app/logs/www-access_log" common
</VirtualHost>
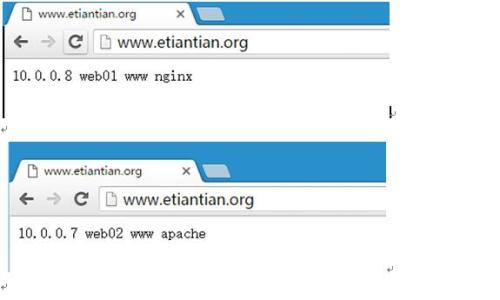
[root@web02 tools]# cat/application/apache/htdocs/www/index.html
10.0.0.7 web02 www apache
[root@web02 tools]# cat /etc/hosts|grep 172.16.1.7
172.16.1.7 web02 www.etiantian.org
## 5、2测试
[root@web02 tools]# /application/apache/bin/apachectl -t
Syntax OK
[root@web02 tools]# /application/apache/bin/apachectlstart
[root@web02 tools]# curl www.etiantian.org
10.0.0.7 web02 www apache
[root@web02 tools]# /application/apache/bin/apachectlstop
[root@web02 tools]# ps -ef|grep httpd|grep -v grep
六、WEB01(nginx)节点配置信息
## 6、1基本配置


[root@web01 tools]# cat/application/nginx/conf/nginx.conf

worker_processes 1;

error_log logs/error.log;

events {

   worker_connections  1024;

}

http {

    include       mime.types;

   default_type application/octet-stream;

    sendfile        on;

   keepalive_timeout  65;

    log_format  main '$remote_addr - $remote_user [$time_local] "$request" '

                      '$status $body_bytes_sent"$http_referer" '

                     '"$http_user_agent" "$http_x_forwarded_for"';

    server {

        listen       80;

       server_name  www.etiantian.org;

        location /{

           root   html/www;

           index  index.html index.htm;

        }

        access_loglogs/access_www.log main;

    }

}

[root@web01 tools]# cat/application/nginx/html/www/index.html

10.0.0.8 web01 www nginx


[root@web01 tools]# cat /etc/hosts|grep 172.16.1.8

172.16.1.8      web01   www.etiantian.org


## 6、2测试

[root@web01 tools]# /application/nginx/sbin/nginx -t

nginx: the configuration file/application/nginx-1.6.3//conf/nginx.conf syntax is ok

nginx: configuration file/application/nginx-1.6.3//conf/nginx.conf test is successful

[root@web01 tools]# /application/nginx/sbin/nginx

[root@web01 tools]# curl www.etiantian.org

10.0.0.8 web01 www nginx
七、WEB02(apache)和 WEB01(nginx)共同配置
#以下配置是临时生效的,重启机器失效。

[root@web02 tools]# ip addr add 10.0.0.3/32 dev lo labello:1

[root@web02 tools]# ip addr|grep 10.0.0.3

    inet10.0.0.3/32 scope global lo:1

[root@web02 tools]# echo "1">/proc/sys/net/ipv4/conf/lo/arp_ignore

[root@web02 tools]# cat/proc/sys/net/ipv4/conf/lo/arp_ignore

1

[root@web02 tools]# echo "2">/proc/sys/net/ipv4/conf/lo/arp_announce

[root@web02 tools]# cat/proc/sys/net/ipv4/conf/lo/arp_announce

2

[root@web02 tools]# echo "1">/proc/sys/net/ipv4/conf/all/arp_ignore

[root@web02 tools]# cat/proc/sys/net/ipv4/conf/all/arp_ignore

1

[root@web02 tools]# echo "2" >/proc/sys/net/ipv4/conf/all/arp_announce

[root@web02 tools]# cat/proc/sys/net/ipv4/conf/all/arp_announce

2
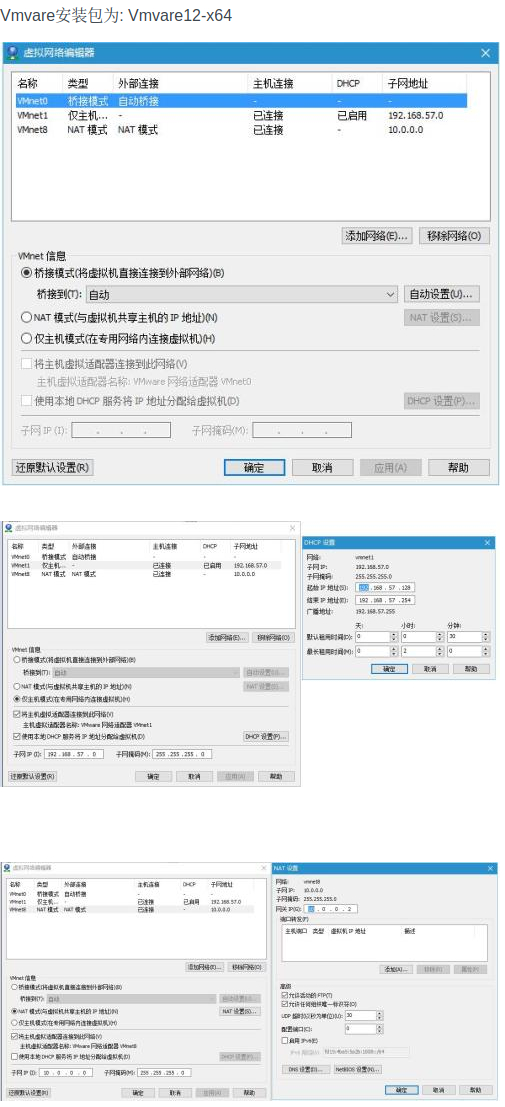
八、以 keepalived 的端口形式配置 LVS(keepalived 双实例双主模式)
## 8、1共同配置

#linux的hosts文件

[root@lb01 tools]# tail -1 /etc/hosts

10.0.0.3       www.etiantian.org


#windows的hosts文件

10.0.0.3  www.etiantian.org


## 8、2启动WEB02(apache)和WEB01(nginx)

[root@web02 tools]# ps -ef|grep httpd

root      2070   1779  0 02:07 pts/0    00:00:00 grep httpd

[root@web02 tools]# /application/apache/bin/apachectlstart

[root@web02 tools]# ps -ef|grep httpd|grep -v grep

root      2074      1  0 02:07 ?        00:00:00/application/apache2.2.31/bin/httpd -k start

www       2075   2074  0 02:07 ?        00:00:00/application/apache2.2.31/bin/httpd -k start

www       2076   2074  0 02:07 ?        00:00:00/application/apache2.2.31/bin/httpd -k start

www       2077   2074  0 02:07 ?        00:00:00/application/apache2.2.31/bin/httpd -k start


[root@web01 tools]# /application/nginx/sbin/nginx -t

nginx: the configuration file /application/nginx-1.6.3//conf/nginx.confsyntax is ok

nginx: configuration file/application/nginx-1.6.3//conf/nginx.conf test is successful

[root@web01 tools]# /application/nginx/sbin/nginx

[root@web01 tools]# netstat -lntup|grep nginx

tcp        0      0 0.0.0.0:80                  0.0.0.0:*                   LISTEN      1694/nginx


## 8、2LVS+负载均衡+NGINX反向代理的LB01主节点

### 8、2、1配置

#### 8、2、1、1keepalived文件配置

[root@lb01 tools]# >/etc/keepalived/keepalived.conf

[root@lb01 tools]# cat /etc/keepalived/keepalived.conf

! Configuration File for keepalived


global_defs {

   router_id lb01

}

vrrp_instance VI_1 {

    state MASTER

    interface eth0

   virtual_router_id 51

    priority 150

    advert_int 1

    authentication{

        auth_typePASS

        auth_pass1111

    }

   virtual_ipaddress {

    10.0.0.3/24 deveth0 label eth0:3

    }

}

vrrp_instance VI_2 {

    state BACKUP

    interface eth0

   virtual_router_id 52

    priority 100

    advert_int 1

    authentication{

        auth_typePASS

        auth_pass1112

    }

   virtual_ipaddress {

    10.0.0.4/24 deveth0 label eth0:4

    }

}

#ipvsadm -A -t 10.0.0.3:80 -s wrr -p 20

virtual_server 10.0.0.3 80 {

    delay_loop6

    lb_algowrr

    lb_kind DR

    nat_mask255.255.255.0

   persistence_timeout 50

    protocolTCP


#ipvsadm -a -t 10.0.0.3:80 -r 10.0.0.7:80 -g -w 1

    real_server10.0.0.7 80 {

        weight1

        TCP_CHECK {

       connect_timeout 8

       nb_get_retry 3

       delay_before_retry 3

       connect_port 80

        }

    }

#ipvsadm -a -t 10.0.0.3:80 -r 10.0.0.8:80 -g -w 1

    real_server10.0.0.8 80 {

        weight1

        TCP_CHECK {

       connect_timeout 8

       nb_get_retry 3

       delay_before_retry 3

       connect_port 80

        }

    }

}


#### 8、2、1、2nginx文件配置

[root@lb01 tools]# >/application/nginx/conf/nginx.conf

[root@lb01 tools]# cat /application/nginx/conf/nginx.conf

worker_processes 1;

error_log logs/error.log;

events {

   worker_connections  1024;

}

http {

    include       mime.types;

   default_type application/octet-stream;

    sendfile        on;

   keepalive_timeout  65;

    upstreamwww_server_pools{

        server172.16.1.7:80 weight=1;

        server172.16.1.8:80 weight=1;

    }

    server {

        listen       10.0.0.3:80;

       server_name  www.etiantian.org;

        location /{

           proxy_pass http://www_server_pools;

           proxy_set_header Host $host;

           proxy_set_header X-Forwarded-For $remote_addr;

        }

    }

}


#### 8、2、1、3hosts文件配置

[root@lb01 tools]# tail -1 /etc/hosts

10.0.0.3       www.etiantian.org


### 8、2、2测试

[root@lb01 tools]# /application/nginx/sbin/nginx -t

nginx: the configuration file/application/nginx-1.6.3/conf/nginx.conf syntax is ok

nginx: [emerg] bind() to 10.0.0.3:80 failed (99: Cannotassign requested address)

nginx: configuration file/application/nginx-1.6.3/conf/nginx.conf test failed

#出现这个的原因是当不同的虚拟主机监听了同一个VIP时,如果lb01的keepalived服务关掉了,那么本机的nginx起不来,因为本地没这个10.0.0.3地址。改内核生效,再起nginx即可。

[root@lb01 tools]# echo 'net.ipv4.ip_nonlocal_bind = 1'>> /etc/sysctl.conf

[root@lb01 tools]# sysctl -p

[root@lb01 tools]# /application/nginx/sbin/nginx -t

nginx: the configuration file/application/nginx-1.6.3/conf/nginx.conf syntax is ok

nginx: configuration file/application/nginx-1.6.3/conf/nginx.conf test is successful

[root@lb01 tools]# /application/nginx/sbin/nginx

[root@lb01 tools]# netstat -lntup|grep nginx

tcp        0      0 10.0.0.3:80                 0.0.0.0:*                   LISTEN      2004/nginx

[root@lb01 tools]# /etc/init.d/keepalived start

Starting keepalived:                                       [  OK  ]


[root@lb01 tools]# ip addr|egrep "10.0.0.3"

    inet10.0.0.3/24 scope global secondary eth0:3

[root@lb01 tools]# ipvsadm -Ln

IP Virtual Server version 1.2.1 (size=4096)

Prot LocalAddress:Port Scheduler Flags

  ->RemoteAddress:Port           ForwardWeight ActiveConn InActConn

TCP  10.0.0.3:80wrr persistent 50

  ->10.0.0.7:80                  Route   1     0          0

  ->10.0.0.8:80                  Route   1     0          0


## 8、3LVS+负载均衡+NGINX反向代理的LB02备节点

### 8、3、1配置

#### 8、3、1、1keepalived文件配置

[root@lb02 nginx]# cat/etc/keepalived/keepalived.conf

! Configuration File for keepalived


global_defs {

   router_id lb02

}

vrrp_instance VI_1 {

    state BACKUP

    interface eth0

   virtual_router_id 51

    priority 100

    advert_int 1

    authentication{

        auth_typePASS

        auth_pass1111

    }

   virtual_ipaddress {

    10.0.0.3/24 deveth0 label eth0:3

    }

}

vrrp_instance VI_2 {

    state MASTER

    interface eth0

   virtual_router_id 52

    priority 150

    advert_int 1

    authentication{

        auth_typePASS

        auth_pass1112

    }

   virtual_ipaddress {

    10.0.0.4/24 deveth0 label eth0:4

    }

}

#ipvsadm -A -t 10.0.0.3:80 -s wrr -p 20

virtual_server 10.0.0.3 80 {

    delay_loop6

    lb_algowrr

    lb_kind DR

    nat_mask255.255.255.0

   persistence_timeout 50

    protocolTCP


#ipvsadm -a -t 10.0.0.3:80 -r 10.0.0.7:80 -g -w 1

    real_server10.0.0.7 80 {

        weight1

        TCP_CHECK {

       connect_timeout 8

       nb_get_retry 3

       delay_before_retry 3

       connect_port 80

        }

    }

#ipvsadm -a -t 10.0.0.3:80 -r 10.0.0.8:80 -g -w 1

    real_server10.0.0.8 80 {

        weight1

        TCP_CHECK {

       connect_timeout 8

       nb_get_retry 3

       delay_before_retry 3

       connect_port 80

        }

    }

}


#### 8、3、1、2nginx文件配置

[root@lb02 nginx]# >/application/nginx/conf/nginx.conf

[root@lb02 nginx]# cat/application/nginx/conf/nginx.conf

worker_processes 1;

error_log logs/error.log;

events {

   worker_connections  1024;

}

http {

    include       mime.types;

   default_type application/octet-stream;

    sendfile        on;

    keepalive_timeout  65;

    upstreamwww_server_pools{

        server172.16.1.7:80 weight=1;

        server172.16.1.8:80 weight=1;

    }

    server {

        listen       10.0.0.3:80;

       server_name  www.etiantian.org;

        location /{

           proxy_pass http://www_server_pools;

           proxy_set_header Host $host;

           proxy_set_header X-Forwarded-For $remote_addr;

        }

    }

}


### 8、3、2测试

[root@lb02 nginx]# /application/nginx/sbin/nginx -t

nginx: the configuration file/application/nginx-1.6.3//conf/nginx.conf syntax is ok

nginx: [emerg] bind() to 10.0.0.3:80 failed (99: Cannotassign requested address)

nginx: configuration file/application/nginx-1.6.3//conf/nginx.conf test failed

#出现这个的原因是当不同的虚拟主机监听了同一个VIP时,如果lb01的keepalived服务关掉了,那么本机的nginx起不来,因为本地没这个10.0.0.3地址。改内核生效,再起nginx即可。

[root@lb02 nginx]# echo 'net.ipv4.ip_nonlocal_bind = 1'>> /etc/sysctl.conf

[root@lb02 nginx]# sysctl -p

[root@lb02 nginx]# /application/nginx/sbin/nginx -t

nginx: the configuration file/application/nginx-1.6.3//conf/nginx.conf syntax is ok

nginx: configuration file/application/nginx-1.6.3//conf/nginx.conf test is successful

[root@lb02 nginx]# /application/nginx/sbin/nginx

[root@lb02 nginx]# netstat -lntup|grep nginx

tcp        0      0 10.0.0.3:80                 0.0.0.0:*                   LISTEN      4229/nginx

tcp        0      0 10.0.0.3:80                 0.0.0.0:*                   LISTEN      4229/nginx

[root@lb02 nginx]# /etc/init.d/keepalived start

Starting keepalived:                                       [  OK  ]

[root@lb02 nginx]# ip addr|egrep "10.0.0.3"

#注意这里一定是没有值的,当lb01的keepalived服务关掉,那么IP漂移后是有值的。

[root@lb02 nginx]# ipvsadm -Ln

IP Virtual Server version 1.2.1 (size=4096)

Prot LocalAddress:Port Scheduler Flags

  ->RemoteAddress:Port           ForwardWeight ActiveConn InActConn

TCP  10.0.0.3:80wrr persistent 50

  ->10.0.0.7:80                  Route   1     0          0

  ->10.0.0.8:80                  Route   1      0         0
九、浏览器测试
标题:LVS+KEEPALIVED(双实例双主模式)+NGINX反向代理
作者:yazong
地址:https://blog.llyweb.com/articles/2016/08/09/1578158848050.html