1、ubuntu18启动慢
1、1找出启动服务列表
root@yalong:~# systemd-analyze blame

#包括启动的服务以及系统启动时的耗时。这里只找到前三个最耗时的即可。

4min 33.091s fstrim.service

3min 40.386s apt-daily-upgrade.service

2min 21.851s apt-daily.service

18.758s dev-sda2.device

15.952s plymouth-quit-wait.service

12.877s systemd-journal-flush.service

8.370s NetworkManager-wait-online.service


很明显,是由于fstrim.service、apt-daily-upgrade.service和apt-daily.service导致系统启动特别慢。
1、2找出启动日志
vim /var/log/boot.log
1、3核实磁盘
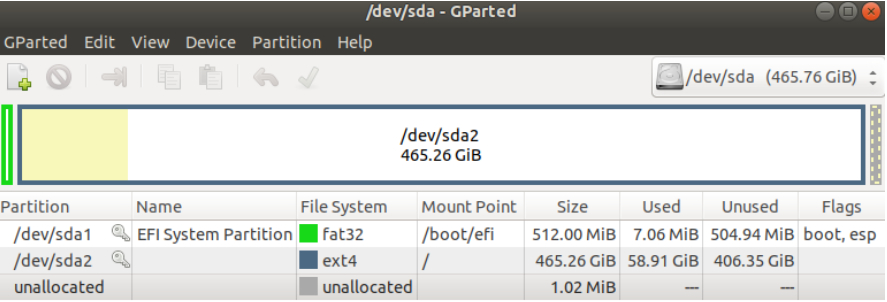
安装一个非常好用的磁盘分区工具——gparted,使用的命令行如下:
sudo apt-get install gparted
通过下面的命令在命令行启动:
sudo gparted
下面可以看到分区:

那么,在系统启动时,我们查看硬盘启动项:
sudo gedit /etc/fstab
是否还有不存在的交互分区,记得先备份,再删除多余的信息。
1、4操作
1.3.1)apt-daily-upgrade.service和apt-daily.service是系统自动更新机制中的服务。

分别有两个方法来关闭自动更新

第一个方法

#如果你的主机运行在封闭的环境中,并且无法连接到有效的更新源,此时可以选择关闭自动更新功能。首选的方法是停止相关的服务:


systemctl status apt-daily-upgrade.service

systemctl stop apt-daily-upgrade.service

systemctl disable apt-daily-upgrade.service


systemctl status apt-daily.service

systemctl stop apt-daily.service

systemctl disable apt-daily.service


第二个方法

修改自动更新程序的配置文件也可以


vim /etc/apt/apt.conf.d/20auto-upgrades

APT::Periodic::Update-Package-Lists "0";

APT::Periodic::Download-Upgradeable-Packages "0";

APT::Periodic::AutocleanInterval "0";

APT::Periodic::Unattended-Upgrade "0";


vim /etc/apt/apt.conf.d/10periodic

APT::Periodic::Update-Package-Lists "0";

APT::Periodic::Download-Upgradeable-Packages "0";

APT::Periodic::AutocleanInterval "0";

APT::Periodic::Unattended-Upgrade "0";


1.3.2)fstrim.service


systemctl status fstrim.service

systemctl stop fstrim.service

systemctl disable fstrim.service
1、5知识扩展
apt-daily
通过定时任务执行更新
Ubuntu 默认定义了 4 个 systemd unit 执行更新任务,它们分别是:


root@yalong:~# ll /lib/systemd/system/|grep apt

-rw-r--r--  1 root root   326 9月   3  2019 apt-daily.service

-rw-r--r--  1 root root   156 9月   3  2019 apt-daily.timer

-rw-r--r--  1 root root   238 9月   3  2019 apt-daily-upgrade.service

-rw-r--r--  1 root root   184 9月   3  2019 apt-daily-upgrade.timer


其中的 apt-daily.timer 和 apt-daily-upgrade.timer 是两个触发器,分别在每天指定的时间触发 apt-daily.service 和 apt-daily-upgrade.service。这两个 service 的类型都是 oneshot,意思是当任务完成后 service 进程退出。这两个 service 其实调用的是同一个脚本: /usr/lib/apt/apt.systemd.daily。

apt-daily.service 为脚本传入参数 "update",其功能为检查系统的更新并下载对应的更新包。apt-daily-upgrade.service 为脚本传入参数 "install",其功能为安装更新并删除缓存在本地的更新包。

#可更新此文件,选择执行相应的命令。


apt-daily.timer 默认每天触发两次,分别为 6 点和 18 点,主要是为了缓解服务器端的下载压力。我们可以根据自身业务的特点设置合适的触发时间。
apt-daily-upgrade.service 默认每天在 6 点触发一次,我们也可以设置为其它时间,比如午夜。
apt.systemd.daily 脚本
/usr/lib/apt/apt.systemd.daily 脚本负责完成与更新相关的一系列工作,这些工作主要分为两大块:

检查更新并下载更新包

安装更新并清理更新包

apt.systemd.daily 脚本中调用 apt-config 命令从 /etc/apt/apt.conf.d/10periodic 文件和 /etc/apt/apt.conf.d/20auto-upgrades 读中取配变量,并根据这些变量的值来控制系统的更新策略。下面我们介绍几个比较重要的配置项。


隔多少天执行一次 apt-get update,默认是 1 天,0 表示不执行该操作:

APT::Periodic::Update-Package-Lists "1";


隔多少天执行一次 apt-get upgrade --download-only 下载更新包,0 表示不执行该操作:

APT::Periodic::Download-Upgradeable-Packages "0";


下载的更新版被缓存在目录 /var/cache/apt/archives/ 中,执行升级操作时直接从缓存目录中读取包文件而不是从网络上下载。


隔多少天执行一次 apt-get autoclean 清除无用的更新包,0 表示不执行该操作:

APT::Periodic::AutocleanInterval "0";


隔多少天执行一次 Unattended-Upgrade 执行系统安全更新(或者所以包的更新),0 表示不执行该操作:

APT::Periodic::Unattended-Upgrade "1";

通过这些配置,我们可以控制自动更新的频率和行为。注意,到目前为止的配置还只能安装系统的安全更新,如果要想安装所有包的更新还需要其它的配置,相关内容我们在后面的小节中介绍。


在继续介绍后面的内容前,让我们先来了解一下 apt.systemd.daily 脚本中用到的 apt-config 命令和 apt.systemd.daily 脚本依赖的配置文件。


因为 apt.systemd.daily 脚本同时调用了 apt-get 和 unattended-upgrade 等命令,所以相关的日志也分散在不同的地方。apt-get 相关的日志在 /var/log/apt 目录下,unattended-upgrade 命令的日志在 /var/log/unattended-upgrades 目录下。
apt-config 命令
apt-config 是一个被 APT 套件使用的内部命令,使用它可以在脚本中提取 /etc/apt/apt.conf 目录下配置文件中的信息。
比如,如果要在脚本中获取 APT::Periodic::Update-Package-Lists 的设置,可以使用下面的代码:

#!/bin/bash

ABC=0

eval $(apt-config shell ABC APT::Periodic::Update-Package-Lists)echo ${ABC}

此时脚本变量 ABC 中保存的就是 APT::Periodic::Update-Package-Lists 的值。

apt-get 相关的日志在 /var/log/apt 目录下。
10periodic 和 20auto-upgrades
/etc/apt/apt.conf.d/10periodic 是 update-notifier-common 的配置文件:

$ dpkg-query -S /etc/apt/apt.conf.d/10periodic

update-notifier-common: /etc/apt/apt.conf.d/10periodic

$ dpkg-query -S /etc/apt/apt.conf.d/20auto-upgrades

dpkg-query: no path found matching pattern /etc/apt/apt.conf.d/20auto-upgrades


在18.04 中,这两个文件的默认内容是一样的。apt.systemd.daily 脚本在注释中说我们可以通过 /etc/apt/apt.conf.d/10periodic 文件自定义相关的变量值,它通过 get-config 命令来获得这些变量的值。但是测试的结果是 /etc/apt/apt.conf.d/20auto-upgrades 文件中的变量会覆盖 /etc/apt/apt.conf.d/10periodic 文件中的变量。看来是 get-config 命令根据文件名称的顺序,排在后面的文件中的变量会覆盖前面文件中的变量。


在 desktop 版本中,通过 GUI 程序修改相关的变量,这两个文件都会被修改并保持一致,所以在 server 版中我们最好也同时修改这两个文件并保持其内容一致。
unattended-upgrades
Ubuntu 实际上是通过 unattended-upgrades 命令来自动安装更新的。Ubuntu 18.04 默认安装了这个包,如果碰到没有安装的情况你还可以通过下面的命令自行安装:

$ sudo apt install unattended-upgrades

unattended-upgrades 的配置文件为

/etc/apt/apt.conf.d/50unattended-upgrades。

#可以编辑此文件,打开注释,让其执行相应的命令。
注意,unattended-upgrades 不仅能够安装系统的安全更新,还可以安装所有包的更新。但是默认的配置只安装安全更新,我们可以通过配置项让 unattended-upgrades 安装所有的包更新或者只安装安全更新。

unattended-upgrades 命令被设计为通过 cron 定时执行系统更新,但在 Ubuntu 18.04 中是通过 systemd 的 timer unit 定时触发 service unit 执行的。
unattended-upgrades 命令的日志文件存放在 /var/log/unattended-upgrades 目录下。


unattended-upgrade 命令的日志在 /var/log/unattended-upgrades 目录下。


unattended-upgrade 命令常见的用法之一是检查系统是否有更新:

$ sudo unattended-upgrade --dry-run

另一种用法是安装更新:

$ sudo unattended-upgrade

在 apt.systemd.daily 脚本中执行 unattended-upgrade 命令时,由于更新包已经提前下载到缓存目录了(/var/cache/apt/archives),所以直接它直接使用缓存中的更新包。
fstrim
SSD 在操作方式上与传统磁性驱动器不同,并且它们需要在软件上另行处理以达到功能优化。


在传统磁盘驱动器上,删除时所删除的文件不会从磁盘中完全删除。这就是为什么你可以恢复已删除的文件的原因。基本上,文件系统仅引用磁盘上文件的位置,并且当文件被删除时,该引用被擦除,以允许你在这些空间中写入新数据覆盖原来的数据。然而,对于 SSD,新数据只能写在驱动器上完全新的或已擦除的单元上。因为必须在写入之前清除空间,如果在写入文件时尚未有足够的可用空间,则必须首先擦除该空间。这可能会对性能产生负面影响。

如果操作系统在写入新数据之前就擦除了未使用的空间,而不是在写入时同时进行擦除,则可以提高文件保存性能。这种做法就是 [TRIM](https://en.wikipedia.org/wiki/Trim_(computing))。 TRIM 命令本质上允许你的操作系统告诉驱动器哪些区域的数据不再使用,以便擦除它们,加快驱动器将来的写入,可以 SSD 的用户提供更佳的体验。

在 Linux 中,fstrim 提供此功能,它可以为写入新数据而准备驱动器,并延长驱动器的使用寿命。


root@yalong-:~# man fstrim

root@yalong-:~# fstrim --help

systemctl status fstrim.timer

systemctl enable fstrim.timer

#可以通过列出所有计时器来验证该计时器是否已启用。

#该服务似乎是在驱动器上运行 TRIM 的最佳方法。这比必须创建自己的 crontab 条目来调用 fstrim 命令要简单得多。不必编辑 fstab 文件也更安全。

root@yalong-:~# systemctl list-timers --all

NEXT                         LEFT        LAST                         PASSED       UNIT                         ACTIVATES

Wed 2021-02-10 15:04:10 CST  28min left  Wed 2021-02-10 14:01:35 CST  34min ago    anacron.timer                anacron.service

Wed 2021-02-10 20:41:36 CST  6h left     Wed 2021-02-10 08:15:05 CST  6h ago       apt-daily.timer              apt-daily.service

Thu 2021-02-11 06:10:07 CST  15h left    Wed 2021-02-10 08:15:05 CST  6h ago       apt-daily-upgrade.timer      apt-daily-upgrade.service

Thu 2021-02-11 11:03:34 CST  20h left    Wed 2021-02-10 12:31:10 CST  2h 4min ago  motd-news.timer              motd-news.service

Thu 2021-02-11 11:12:56 CST  20h left    Wed 2021-02-10 11:12:56 CST  3h 23min ago systemd-tmpfiles-clean.timer systemd-tmpfiles-clean.service

Mon 2021-02-15 00:00:00 CST  4 days left Wed 2021-02-10 08:15:05 CST  6h ago       fstrim.timer                 fstrim.service

n/a                          n/a         n/a                          n/a          snapd.snap-repair.timer      snapd.snap-repair.service

n/a                          n/a         Wed 2021-02-10 10:59:20 CST  3h 36min ago ureadahead-stop.timer        ureadahead-stop.service


8 timers listed.
systemctl disable和systemctl mask
执行 systemctl mask xxx会屏蔽这个服务,不可用。它和systemctl disable xxx的区别在于,systemctl disable xxx只是删除了符号链接,systemctl mask xxx会建立一个指向/dev/null的符号链接,这样,即使有其他服务要启动被mask的服务,仍然无法执行成功。
systemctl disable
root@yalong:~# ll /etc/systemd/system/

#软连接指向sshd.service -> /lib/systemd/system/ssh.service

#注意sshd.service指向的是ssh,而不是sshd。

#在/etc/systemd/system/这个目录中创建需要的软连接,表示服务需要进行启动,指向/lib/systemd/system/目录。

root@yalong:~# ll /lib/systemd/system/


root@yalong:~# systemctl status sshd.service

● ssh.service - OpenBSD Secure Shell server

   Loaded: loaded (/lib/systemd/system/ssh.service; enabled; vendor preset: enabled)

   Active: active (running) since Wed 2021-02-10 10:58:24 CST; 1h 52min ago

root@yalong:~# systemctl stop sshd.service

root@yalong:~# systemctl status sshd.service

● ssh.service - OpenBSD Secure Shell server

   Loaded: loaded (/lib/systemd/system/ssh.service; enabled; vendor preset: enabled)

   Active: inactive (dead) since Wed 2021-02-10 12:56:31 CST; 1s ago

root@yalong:~# systemctl disable sshd.service

Removed /etc/systemd/system/sshd.service.

Removed /etc/systemd/system/multi-user.target.wants/ssh.service.


root@yalong:~# systemctl enable ssh

Synchronizing state of ssh.service with SysV service script with /lib/systemd/systemd-sysv-install.

Executing: /lib/systemd/systemd-sysv-install enable ssh

Created symlink /etc/systemd/system/sshd.service → /lib/systemd/system/ssh.service.

root@yalong:~# systemctl status sshd.service

● ssh.service - OpenBSD Secure Shell server

   Loaded: loaded (/lib/systemd/system/ssh.service; enabled; vendor preset: enabled)

   Active: inactive (dead)

root@yalong:~# systemctl start sshd.service

root@yalong:~# systemctl status sshd.service

● ssh.service - OpenBSD Secure Shell server

   Loaded: loaded (/lib/systemd/system/ssh.service; enabled; vendor preset: enabled)

   Active: active (running) since Wed 2021-02-10 13:07:49 CST; 1s ago
systemctl mask
root@yalong:~# systemctl mask sshd.service

Failed to mask unit: File /etc/systemd/system/sshd.service already exists and is a symlink to /lib/systemd/system/ssh.service.

root@yalong:~# systemctl stop sshd.service

root@yalong:~# systemctl mask sshd.service

Failed to mask unit: File /etc/systemd/system/sshd.service already exists and is a symlink to /lib/systemd/system/ssh.service.

root@yalong:~# systemctl disable sshd.service

Removed /etc/systemd/system/sshd.service.

Removed /etc/systemd/system/multi-user.target.wants/ssh.service.

root@yalong:~# systemctl mask sshd.service

Unit sshd.service does not exist, proceeding anyway.

Created symlink /etc/systemd/system/sshd.service → /dev/null.

root@yalong:~# ll /etc/systemd/system/sshd.service

lrwxrwxrwx 1 root root 9 2月  10 13:11 /etc/systemd/system/sshd.service -> /dev/null

root@yalong:~# systemctl status sshd.service

● sshd.service

   Loaded: masked (/dev/null; bad)

   Active: inactive (dead)

root@yalong:~# systemctl start sshd.service

Failed to start sshd.service: Unit sshd.service is masked.

root@yalong:~# systemctl enable sshd.service

Failed to enable unit: Unit file /etc/systemd/system/sshd.service is masked.

root@yalong:~# systemctl disable sshd.service

Unit /etc/systemd/system/sshd.service is masked, ignoring.

root@yalong:~# systemctl unmask sshd.service

Removed /etc/systemd/system/sshd.service.

root@yalong:~# systemctl status sshd.service

Unit sshd.service could not be found.

root@yalong:~# systemctl enable ssh

#注意这里使用的是ssh,而不是sshd。

Synchronizing state of ssh.service with SysV service script with /lib/systemd/systemd-sysv-install.

Executing: /lib/systemd/systemd-sysv-install enable ssh

Created symlink /etc/systemd/system/sshd.service → /lib/systemd/system/ssh.service.

root@yalong:~# systemctl status ssh

● ssh.service - OpenBSD Secure Shell server

   Loaded: loaded (/lib/systemd/system/ssh.service; enabled; vendor preset: enabled)

   Active: inactive (dead)


2月 10 10:58:33 yalong sshd[1533]: Server listening on :: port 22.

2月 10 12:56:31 yalong systemd[1]: Stopping OpenBSD Secure Shell server...

2月 10 12:56:31 yalong systemd[1]: Stopped OpenBSD Secure Shell server.

2月 10 13:07:49 yalong systemd[1]: Starting OpenBSD Secure Shell server...

2月 10 13:07:49 yalong sshd[18172]: Server listening on 0.0.0.0 port 22.

2月 10 13:07:49 yalong sshd[18172]: Server listening on :: port 22.

2月 10 13:07:49 yalong systemd[1]: Started OpenBSD Secure Shell server.

2月 10 13:11:21 yalong systemd[1]: Stopping OpenBSD Secure Shell server...

2月 10 13:11:21 yalong sshd[18172]: Received signal 15; terminating.

2月 10 13:11:21 yalong systemd[1]: Stopped OpenBSD Secure Shell server.

root@yalong:~# systemctl status sshd.service

● ssh.service - OpenBSD Secure Shell server

   Loaded: loaded (/lib/systemd/system/ssh.service; enabled; vendor preset: enabled)

   Active: inactive (dead)

2月 10 10:58:33 yalong sshd[1533]: Server listening on :: port 22.

2月 10 12:56:31 yalong systemd[1]: Stopping OpenBSD Secure Shell server...

2月 10 12:56:31 yalong systemd[1]: Stopped OpenBSD Secure Shell server.

2月 10 13:07:49 yalong systemd[1]: Starting OpenBSD Secure Shell server...

2月 10 13:07:49 yalong sshd[18172]: Server listening on 0.0.0.0 port 22.

2月 10 13:07:49 yalong sshd[18172]: Server listening on :: port 22.

2月 10 13:07:49 yalong systemd[1]: Started OpenBSD Secure Shell server.

2月 10 13:11:21 yalong systemd[1]: Stopping OpenBSD Secure Shell server...

2月 10 13:11:21 yalong sshd[18172]: Received signal 15; terminating.

2月 10 13:11:21 yalong systemd[1]: Stopped OpenBSD Secure Shell server.

root@yalong:~# systemctl start sshd.service

root@yalong:~# systemctl status sshd.service

● ssh.service - OpenBSD Secure Shell server

   Loaded: loaded (/lib/systemd/system/ssh.service; enabled; vendor preset: enabled)

   Active: active (running) since Wed 2021-02-10 13:14:37 CST; 1s ago

  Process: 18654 ExecStartPre=/usr/sbin/sshd -t (code=exited, status=0/SUCCESS)

 Main PID: 18656 (sshd)

    Tasks: 1 (limit: 4915)

   CGroup: /system.slice/ssh.service

           └─18656 /usr/sbin/sshd -D
/etc/fstab
文件内容
磁盘被手动挂载之后都必须把挂载信息写入/etc/fstab这个文件中,否则下次开机启动时仍然需要重新挂载。
系统开机时会主动读取/etc/fstab这个文件中的内容,根据文件里面的配置挂载磁盘。这样我们只需要将磁盘的挂载信息写入这个文件中我们就不需要每次开机启动之后手动进行挂载了。
最好使用硬盘的uuid来进行挂载,而不是通过/dev/sda1这样分区挂载。如果是针对一整个硬盘进行挂载的话。因为通过分区挂载当分区改变,就会出现挂载不上的情况。(uuid通过bikid命令查看)
root@yalong-:~# cat /etc/fstab

# /etc/fstab: static file system information.

#

# Use 'blkid' to print the universally unique identifier for a

# device; this may be used with UUID= as a more robust way to name devices

# that works even if disks are added and removed. See fstab(5).

#

# <file system> <mount point>   <type>  <options>    <dump>  <pass>

# / was on /dev/sda2 during installation

UUID=XX 				/ 			ext4   errors=remount-ro 	 0       1

# /boot/efi was on /dev/sda1 during installation

UUID=YY  			 /boot/efi       vfat    umask=0077      	 0       1

/swapfile             none         swap    	sw              0       0


root@yalong:/var/cache/apt/archives# df -h

Filesystem      Size  Used Avail Use% Mounted on

/dev/sda2       457G   51G  384G  12% /

/dev/sda1       511M  6.1M  505M   2% /boot/efi


#查看硬盘分区

#Linux fdisk是一个创建和维护分区表的程序,它兼容DOS类型的分区表、BSD或者SUN类型的磁盘列表。

root@yalong:/var/cache/apt/archives# fdisk -l

Disk /dev/sda: 465.8 GiB, 500107862016 bytes, 976773168 sectors

Units: sectors of 1 * 512 = 512 bytes

Sector size (logical/physical): 512 bytes / 512 bytes

I/O size (minimum/optimal): 512 bytes / 512 bytes

Disklabel type: gpt

Disk identifier: CBAD7CE3-253A-4B13-9AEB-8EB1989BAEB3


Device       Start       End   Sectors   Size Type

/dev/sda1     2048   1050623   1048576   512M EFI System

/dev/sda2  1050624 976771071 975720448 465.3G Linux filesystem


#查看硬盘文件系统类型

#在Linux下可以使用 blkid命令 对查询设备上所采用文件系统类型进行查询。blkid主要用来对系统的块设备(包括交换分区)所使用的文件系统类型、LABEL、UUID等信息进行查询。要使用这个命令必须安装e2fsprogs软件包。

root@yalong:/var/cache/apt/archives# blkid

/dev/sda1: UUID="XX" TYPE="vfat" PARTLABEL="EFI System Partition" PARTUUID="XXX"

/dev/sda2: UUID="YY" TYPE="ext4" PARTUUID="YYY"
挂载的限制
根目录是必须挂载的,而且一定要先于其他mount point被挂载。因为mount是所有目录的跟目录,其他木有都是由根目录 /衍生出来的。
挂载点必须是已经存在的目录。
挂载点的指定可以任意,但必须遵守必要的系统目录架构原则。
所有挂载点在同一时间只能被挂载一次。
所有分区在同一时间只能挂在一次。
若进行卸载,必须将工作目录退出挂载点(及其子目录)之外。
字段解释
(第一列)<file system> 要挂载的分区或存储设备。磁盘设备文件或者该设备的Label或者UUID。

查看分区的label和uuid:

 Label就是分区的标签,在最初安装系统是填写的挂载点就是标签的名字。可以通过查看一个分区的superblock中的信息找到UUID和Label name。

例如我们要查看/dev/sda1这个设备的uuid和label name等。

#为什么这里/dev/sda1不行呢?不是真正的分区挂载磁盘?

root@yalong-:# dumpe2fs -h /dev/sda2

dumpe2fs 1.44.1 (24-Mar-2018)

Filesystem volume name:   <none>

Last mounted on:          / #label name

Filesystem UUID:          XX

Filesystem magic number:  0xxx11

简单点的方式我们可以通过下面这个命令来查看

root@yalong-:# blkid /dev/sda2

/dev/sda2: UUID="XX" TYPE="ext4" PARTUUID="YY"

root@yalong-:# blkid /dev/sda1

/dev/sda1: UUID="CEBC-FA82" TYPE="vfat" PARTLABEL="EFI System Partition" PARTUUID="YY"

root@yalong-:# blkid /dev/sda

/dev/sda: PTUUID="XX" PTTYPE="gpt"


使用设备名和label及uuid作为标识的不同:

使用设备名称(/dev/sda)来挂载分区时是被固定死的,一旦磁盘的插槽顺序发生了变化,就会出现名称不对应的问题。因为这个名称是会改变的。

不过使用label挂载就不用担心插槽顺序方面的问题。不过要随时注意你的Label name。

至于UUID,每个分区被格式化以后都会有一个UUID作为唯一的标识号。使用uuid挂载的话就不用担心会发生错乱的问题了。


(第二列)<mount point>或<dir>  挂载的目录位置

(第三列)<type> 挂载分区的文件系统类型,比如:ext3、ext4、xfs、swap。

(第四列)<options> 挂载使用的参数有哪些。举例如下:

auto - 在启动时或键入了 mount -a 命令时自动挂载。

noauto - 只在你的命令下被挂载。

exec - 允许执行此分区的二进制文件。

noexec - 不允许执行此文件系统上的二进制文件。

ro - 以只读模式挂载文件系统。

rw - 以读写模式挂载文件系统。

user - 允许任意用户挂载此文件系统,若无显示定义,隐含启用 noexec, nosuid, nodev 参数。

users - 允许所有 users 组中的用户挂载文件系统.nouser - 只能被 root 挂载。

owner - 允许设备所有者挂载.sync - I/O 同步进行。

async - I/O 异步进行。

dev - 解析文件系统上的块特殊设备。

nodev - 不解析文件系统上的块特殊设备。

suid - 允许 suid 操作和设定 sgid 位。这一参数通常用于一些特殊任务,使一般用户运行程序时临时提升权限。

nosuid - 禁止 suid 操作和设定 sgid 位。

noatime - 不更新文件系统上 inode 访问记录,可以提升性能。

nodiratime - 不更新文件系统上的目录 inode 访问记录,可以提升性能(参见 atime 参数)。

relatime - 实时更新 inode access 记录。只有在记录中的访问时间早于当前访问才会被更新。(与 noatime 相似,但不会打断如 mutt 或其它程序探测文件在上次访问后是否被修改的进程。),可以提升性能。

flush - vfat 的选项,更频繁的刷新数据,复制对话框或进度条在全部数据都写入后才消失。defaults - 使用文件系统的默认挂载参数,例如 ext4 的默认参数为:rw, suid, dev, exec, auto, nouser, async。


(第五列)<dump>  能否被dump备份命令使用。dump 工具通过它决定何时作备份, dump 会检查其内容,并用数字来决定是否对这个文件系统进行备份。 允许的数字是 0 和 1 。0 表示忽略, 1 则进行备份。大部分的用户是没有安装 dump 的 ,对他们而言 <dump> 应设为 0。


(第六列)<pass> 是否检验扇区。开机的过程中,系统默认会以fsck检验我们系统是否为完整(clean)。fsck 读取 <pass> 的数值来决定需要检查的文件系统的检查顺序。允许的数字是0, 1, 和2。 根目录应当获得最高的优先权 1,最早检验,一般根目录会选择。 其它所有需要被检查的设备设置为 2,1检验完成之后进行检验。 0 表示设备不会被 fsck 所检查。
参考链接
https://www.cnblogs.com/sparkdev/p/11376560.html

https://blog.csdn.net/ChenTianyu666/article/details/102924953

https://blog.csdn.net/stpice/article/details/104569146/

https://blog.csdn.net/youmatterhsp/article/details/83933158

https://www.cnblogs.com/FengGeBlog/p/10178824.html

https://linux.cn/article-8177-1.html

https://m.linuxidc.com/Linux/2019-08/160069.htm
标题:ubuntu18启动缓慢(排查一系列内容,涉及日志、磁盘、定时器)
作者:yazong
地址:https://blog.llyweb.com/articles/2021/02/10/1612941763685.html