创建nginx-ds
#首先创建一个nginx的daemonset(ds):nginx-ds
[root@node-1 ~]# cd ~
[root@node-1 ~]# pwd
/root
#只在node-1的当前root节点中写入配置。这个文件应该设置规范放在固定的位置。
#1、创建nginx-ds的文件内容:创建了service、pod、daemonset。打了label。
[root@node-1 ~]# cat > nginx-ds.yml <<EOF
apiVersion: v1
kind: Service
metadata:
  name: nginx-ds
  labels:
    app: nginx-ds
spec:
  #用NodePort的形式去暴露这个服务
  type: NodePort
  selector:
    app: nginx-ds
  ports:
  - name: http
    #端口80
    port: 80
    targetPort: 80
---
apiVersion: apps/v1
kind: DaemonSet
metadata:
  name: nginx-ds
spec:
  selector:
    matchLabels:
      app: nginx-ds
  template:
    metadata:
      labels:
        app: nginx-ds
    spec:
      containers:
      - name: my-nginx
        image: nginx:1.19
        ports:
        - containerPort: 80
EOF
[root@node-1 ~]# ll nginx-ds.yml
-rw-r--r--. 1 root root 497 Nov  1 17:28 nginx-ds.yml


#2、创建nginx-ds
[root@node-1 ~]# kubectl apply -f nginx-ds.yml
service/nginx-ds created
daemonset.apps/nginx-ds created
#三个节点都创建了nginx-ds。上述创建的pod、daemonset、label、service的名称是nginx-ds。
#只能在master主节点查看。
[root@node-1/2 ~]# kubectl get pods -o wide
NAME             READY   STATUS    RESTARTS   AGE   IP             NODE     NOMINATED NODE   READINESS GATES
nginx-ds-5h4pl   1/1     Running   0          33s   10.233.25.11   node-1   <none>           <none>
nginx-ds-f5lmp   1/1     Running   0          33s   10.233.45.37   node-3   <none>           <none>
nginx-ds-qb5ns   1/1     Running   0          33s   10.233.5.28    node-2   <none>           <none>

#3、再次检查(三个节点):检查POD。上述创建的daemonset的container名称是my-nginx。
[root@node-1 ~]# crictl ps -a|grep my-nginx
CONTAINER           IMAGE               CREATED                  STATE               NAME                       ATTEMPT             POD ID
d1348efe821b5       f0b8a9a541369       6 minutes ago            Running             my-nginx                   0                   fc9b677898a05
[root@node-2 ~]# crictl ps -a|grep my-nginx
CONTAINER           IMAGE               CREATED                  STATE               NAME                       ATTEMPT             POD ID
26b9b52b7911a       f0b8a9a541369       4 minutes ago            Running             my-nginx                   0                   6ba4f4c88cf7b
[root@node-3 ~]# crictl ps|grep my-nginx
CONTAINER           IMAGE               CREATED                  STATE               NAME                         ATTEMPT             POD ID
8f3590c3c2ede       f0b8a9a541369       4 minutes ago            Running             my-nginx                     0                   1bc535b4bca36
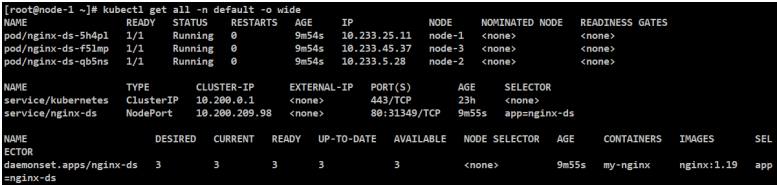
#4、再次检查(2个节点):默认default命名空间下的所有服务。
[root@node-1 ~]# kubectl get all -n default

#5、再次检查(2个节点):默认default命名空间下的服务。更具体。
[root@node-1 ~]# kubectl get all -n default -o wide
检查各种IP的连通性
#检查各个node上的pod ip的连通性
[root@node-1/2 ~]# kubectl get pods -o wide

#查看各个网卡
[root@node-1 ~]# ifconfig
tunl0:10.233.25.0
[root@node-2 ~]# ifconfig
tunl0:10.233.5.0
[root@node-3 ~]# ifconfig
tunl0:10.233.45.0


#在每个节点上ping pod ip
[root@node-1 ~]# ping 10.233.25.11
PING 10.233.25.11 (10.233.25.11) 56(84) bytes of data.
64 bytes from 10.233.25.11: icmp_seq=1 ttl=64 time=0.115 ms
[root@node-1 ~]# ping 10.233.45.37
PING 10.233.45.37 (10.233.45.37) 56(84) bytes of data.
64 bytes from 10.233.45.37: icmp_seq=1 ttl=63 time=0.553 ms
[root@node-1 ~]# ping 10.233.5.28
PING 10.233.5.28 (10.233.5.28) 56(84) bytes of data.
64 bytes from 10.233.5.28: icmp_seq=1 ttl=63 time=0.364 ms

[root@node-2 ~]# ping 10.233.25.11
PING 10.233.25.11 (10.233.25.11) 56(84) bytes of data.
64 bytes from 10.233.25.11: icmp_seq=1 ttl=63 time=0.496 ms
[root@node-2 ~]# ping 10.233.45.37
PING 10.233.45.37 (10.233.45.37) 56(84) bytes of data.
64 bytes from 10.233.45.37: icmp_seq=1 ttl=63 time=0.397 ms
[root@node-2 ~]# ping 10.233.5.28
PING 10.233.5.28 (10.233.5.28) 56(84) bytes of data.
64 bytes from 10.233.5.28: icmp_seq=1 ttl=64 time=0.048 ms

[root@node-3 ~]# ping 10.233.25.11
PING 10.233.25.11 (10.233.25.11) 56(84) bytes of data.
64 bytes from 10.233.25.11: icmp_seq=1 ttl=63 time=0.598 ms
[root@node-3 ~]# ping 10.233.45.37
PING 10.233.45.37 (10.233.45.37) 56(84) bytes of data.
64 bytes from 10.233.45.37: icmp_seq=1 ttl=64 time=0.053 ms
[root@node-3 ~]# ping 10.233.5.28
PING 10.233.5.28 (10.233.5.28) 56(84) bytes of data.
64 bytes from 10.233.5.28: icmp_seq=1 ttl=63 time=0.359 ms
#检查service的可行性
[root@node-1/2 ~]# kubectl get svc

#继上述检查service的可行性:在每个节点上访问服务
#这里是service的IP,对应的是80端口。在执行时,服务可能不会返回内容。
[root@node-1 ~]# curl 10.200.209.98:80
#继上述检查service的可行性:在每个节点检查node-port可用性
#这里是实际的机器IP,对应的是31349端口。而不要用/etc/hosts中的node-1/2/3映射名称,服务可能不会返回内容(返回空不是一码事)。
[root@node-1 ~]# curl 172.16.1.21/22/23:31349
Welcome to nginx!
[root@node-1 ~]# curl 10.0.0.21/22/23:31349
Welcome to nginx!
#而通过实际IP访问80端口是不对的!
[root@node-1 ~]# curl 172.16.1.21/22/23:80
404 Not Found
[root@node-1 ~]# curl 10.0.0.21/22/23:80
404 Not Found
#那么从这里可以推测:
#1、10.200.209.98是service的IP,通过80端口代理了各个POD,当然各个POD的端口也是80。
[root@node-1 ~]# curl 10.200.209.98:80
[root@node-1 ~]# curl 10.233.25.11:80
[root@node-1 ~]# curl 10.233.5.28:80
[root@node-1 ~]# curl 10.233.45.37:80
#正常来说,上述curl应该返回”Welcome to nginx!页面”,可有时服务可能不会返回。
#2、发现31349是kube-proxy端口,这个端口是给机器的真正IP使用的。
[root@node-1 ~]# curl 172.16.1.21/22/23:31349
Welcome to nginx!
[root@node-1 ~]# curl 10.0.0.21/22/23:31349
Welcome to nginx!
#而不要使用80端口
[root@node-1 ~]# curl 172.16.1.21/22/23:80
404 Not Found
[root@node-1 ~]# curl 10.0.0.21/22/23:80
404 Not Found
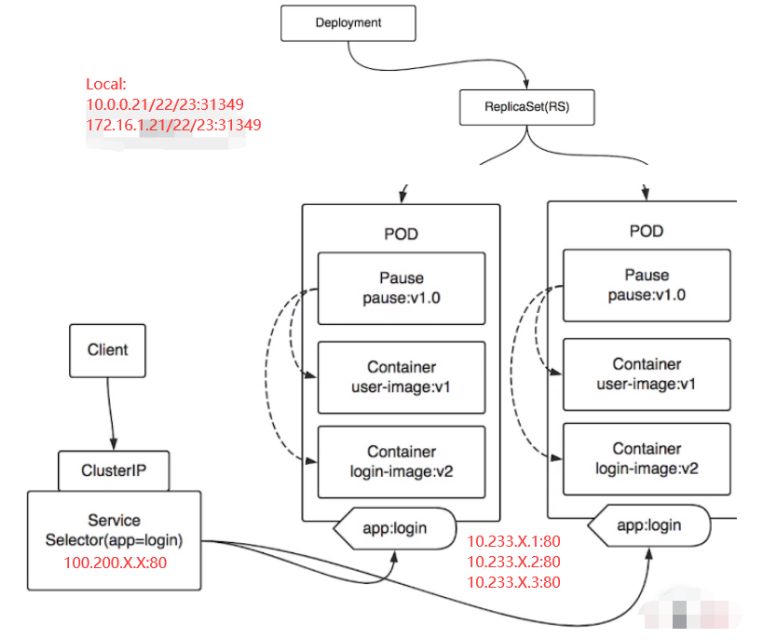
#3、那么这里可以从2-2章节的图推测出这么一张服务访问关系:
访问路径:serviceIP:80==>podIP:80==>localIP:31349(响应nginx)
检查DNS的可用性
#只在node-1的当前root节点中写入配置。
# 创建一个nginx pod
[root@node-1 ~]# cat > pod-nginx.yaml <<EOF
apiVersion: v1
kind: Pod
metadata:
  name: nginx
spec:
  containers:
  - name: nginx
    image: docker.io/library/nginx:1.19
    ports:
    - containerPort: 80
EOF

# 创建pod
[root@node-1 ~]# kubectl apply -f pod-nginx.yaml
pod/nginx created

# 进入pod,进入bash,查看dns
[root@node-1 ~]# kubectl exec nginx -it -- /bin/bash

# 查看dns配置
root@nginx:/# cat /etc/resolv.conf
search default.svc.cluster.local svc.cluster.local cluster.local
#169.254.25.10是定义好的DNS地址
#这个nameserver在[root@node-1 kubespray-2.15.0]# vim inventory/mycluster/group_vars/k8s-cluster/k8s-cluster.yml中配置
nameserver 169.254.25.10
options ndots:5

# 查看名字是否可以正确解析
root@nginx:/# ping nginx-ds			在创建nginx-ds中配置。
bash: ping: command not found
#成功访问nginx
root@nginx:/# curl nginx-ds:80
Welcome to nginx!

#检查创建的POD
[root@node-1 ~]# kubectl get all -n default -o wide

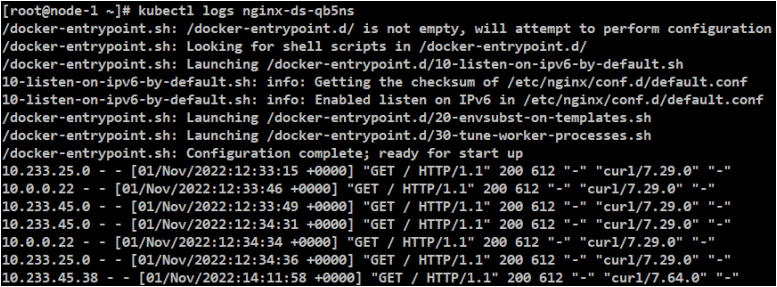
日志功能
#日志功能
#测试使用kubectl查看pod的容器日志
[root@node-1 ~]# kubectl get all -n default -o wide

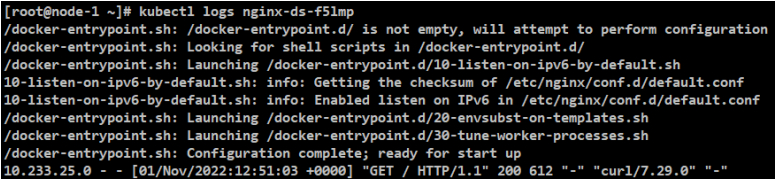
[root@node-1 ~]# kubectl logs nginx

[root@node-1 ~]# kubectl logs nginx-ds-f5lmp
[root@node-1 ~]# kubectl logs nginx-ds-qb5ns
EXEC功能
[root@node-1 ~]# kubectl get pods -l app=nginx-ds
NAME             READY   STATUS    RESTARTS   AGE
nginx-ds-5h4pl   1/1     Running   0          5h1m
nginx-ds-f5lmp   1/1     Running   0          5h1m
nginx-ds-qb5ns   1/1     Running   0          5h1m

[root@node-1 ~]# kubectl exec -it nginx-ds-5h4pl -- nginx -v
nginx version: nginx/1.19.10
标题:Kubernetes(四)kubespray方式(4.4)集群冒烟测试(对应5-9)
作者:yazong
地址:https://blog.llyweb.com/articles/2022/11/01/1667313549080.html