服务端nginx,10.13.10.13
nginx部分
#nginx配置

server {

	  listen 80;

	  server_name  resource.xx;

	  rewrite ^(.*) https://${server_name}$1 permanent;

}

server {


		listen       443;

		#listen       80;

		server_name  resource.xx;

		ssl on;

		root html;

		index index.html index.htm;

		ssl_certificate /data/smartSaas/software/nginx/conf/sslkey/xx/4871619__xx.pem;

		ssl_certificate_key /data/smartSaas/software/nginx/conf/sslkey/xx/4871619__xx.key;

		ssl_session_timeout 5m;

		ssl_ciphers ECDHE-RSA-AES128-GCM-SHA256:ECDHE:ECDH:AES:HIGH:!NULL:!aNULL:!MD5:!ADH:!RC4;

		ssl_protocols TLSv1 TLSv1.1 TLSv1.2;

		ssl_prefer_server_ciphers on;


		charset utf-8;

		client_max_body_size 400m;


		location /local/download/ {

				alias /data/smartSaas/service/application/files/saas-local-static/;

				index index.html;

		}


		location / {

				root   /50x.html;

		}

		error_page  400 403 404 500 502 503 504  /404.html;

		location = /404.html {

						root   /50x.html;

		}

}
nfs部分
#安装nfs相关包
[root@ ~]# yum install nfs-utils rpcbind -y
#启动rpcbind服务
[root@ ~]# service rpcbind start
#启动 NFS 服务后 rpc 服务已经启用了对 NFS 的端口映射列表
#查看rpcinfo信息
[root@ ~]# rpcinfo -p localhost
program vers proto port service
100000 4 tcp 111 portmapper
100000 3 tcp 111 portmapper
100000 2 tcp 111 portmapper
100000 4 udp 111 portmapper
100000 3 udp 111 portmapper
100000 2 udp 111 portmapper
100024 1 udp 18733 status
100005 1 udp 20048 mountd
100005 1 tcp 20048 mountd
100024 1 tcp 36878 status
100005 2 udp 20048 mountd
100005 2 tcp 20048 mountd
100005 3 udp 20048 mountd
100005 3 tcp 20048 mountd
100003 3 tcp 2049 nfs
100003 4 tcp 2049 nfs
100227 3 tcp 2049 nfs_acl
100003 3 udp 2049 nfs
100003 4 udp 2049 nfs
100227 3 udp 2049 nfs_acl
100021 1 udp 15211 nlockmgr
100021 3 udp 15211 nlockmgr
100021 4 udp 15211 nlockmgr
100021 1 tcp 25850 nlockmgr
100021 3 tcp 25850 nlockmgr
100021 4 tcp 25850 nlockmgr
#先查看rpcinfo再启动nfs
[root@ ~]# service nfs start
#检查rpcbind服务启动情况
[root@ ~]# netstat -lntup|grep 111
tcp 0 0 0.0.0.0:111 0.0.0.0:* LISTEN 12888/rpcbind
tcp6 0 0 :::111 :::* LISTEN 12888/rpcbind
udp 0 0 0.0.0.0:111 0.0.0.0:* 12888/rpcbind
udp6 0 0 :::111 :::* 12888/rpcbind
#检查nfs服务启动情况
[root@ ~]# netstat -lntup|grep 2049
tcp 0 0 0.0.0.0:2049 0.0.0.0:* LISTEN -
tcp6 0 0 :::2049 :::* LISTEN -
udp 0 0 0.0.0.0:2049 0.0.0.0:* -
udp6 0 0 :::2049 :::* -
#创建目录并分配用户权限
[root@ ~]# mkdir -p /data/smartSaas/service/application/files/saas-local-static
[root@ ~]# chown -R microservices.microservices /data/smartSaas/service/application
[root@ ~]# ll -ld microservices.microservices /data/smartSaas/service/application/files/saas-local-static
#这里最好使用匿名用户:useradd nfsuser -M -s /sbin/nologin
#id microservices。获取uid对应anonuid,gid对应anongid。
--务必保证服务端和客户端的用户是同一个,目录权限也是同一个,这里设置服务端的组ID即可,跟客户端的组ID无关。
[root@ ~]# id microservices
uid=1002(microservices) gid=1002(microservices) groups=1002(microservices)
#编辑exports,编辑的时候用红色警告可忽略
[root@ ~]# vim /etc/exports
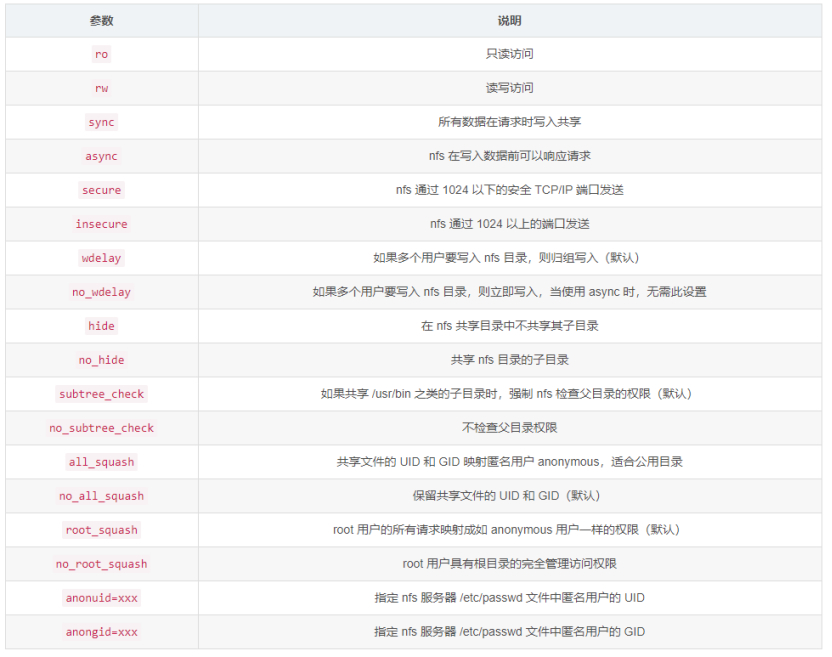
/data/smartSaas/service/application/files/saas-local-static 10.13.10.0/24(rw,sync,anonuid=1002,anongid=1002,all_squash)
#配置挂载生效
[root@ ~]# exportfs -r
#查看本地挂载情况
[root@ ~]# showmount -e 127.0.0.1
Export list for 127.0.0.1:
/data/smartSaas/service/application/files/saas-local-static 10.13.10.0/24
[root@ ~]# cat /var/lib/nfs/etab
/data/smartSaas/service/application/files/saas-local-static 10.13.10.0/24(rw,sync,wdelay,hide,nocrossmnt,secure,root_squash,all_squash,no_subtree_check,secure_locks,acl,no_pnfs,anonuid=1002,anongid=1002,sec=sys,rw,secure,root_squash,all_squash)
#开机启动
[root@ ~]# systemctl enable rpcbind
[root@ ~]# systemctl enable nfs
#重启服务
[root@ ~]# service rpcbind restart
[root@ ~]# service nfs restart
#如果nginx没反应,可以执行重载命令。
[root@ ~]# nginx -t
[root@ ~]# nginx -s reload
--验证
客户端和服务端在目录中读写试试。并用nginx访问。
客户端,10.13.10.13为服务端地址
#安装nfs相关包

[root@ ~]# yum install nfs-utils rpcbind -y


#启动服务

#注意客户端不开启nfs

[root@ ~]# service rpcbind start


#创建目录并分配写读用户权限

[root@ ~]# mkdir -p /data/smartSaas/service/application/files/saas-local-static

#注意客户端不用分配此目录权限

[root@ ~]# ll -ld microservices.microservices /data/smartSaas/service/application/files/saas-local-static


#挂载远程磁盘

[root@ ~]# mount -t nfs 10.13.10.13:/data/smartSaas/service/application/files/saas-local-static  /data/smartSaas/service/application/files/saas-local-static


#检查远程服务挂载情况,有时不显示最终也能使用。

[root@ ~]#  showmount -e  10.13.10.13

Export list for 10.13.10.13:

/data/smartSaas/service/application/files/saas-local-static 10.13.10.0/24


#开机启动

[root@ ~]# systemctl enable rpcbind


#检查rc.local是否是可执行命令

[root@ ~]# ll /etc/rc.d/rc.local

[root@ ~]# chmod +x /etc/rc.d/rc.local


#设置挂载磁盘开机启动

[root@ ~]# vim /etc/rc.local

mount -t nfs 10.13.10.13:/data/smartSaas/service/application/files/saas-local-static  /data/smartSaas/service/application/files/saas-local-static


#验证挂载情况

[root@ ~]# df -h


#重启rpcbind服务使其生效

[root@ ~]# service rpcbind restart


--验证

客户端和服务端在目录中读写试试。并用nginx访问。


#取消挂载

[root@ ~]#  umount /data/smartSaas/service/application/files/saas-local-static

umount.nfs4: /data/smartSaas/service/application/files/saas-local-static: device is busy

[root@ ~]#  umount -lf /data/smartSaas/service/application/files/saas-local-static

[root@ saas-local-static]# pwd

/data/smartSaas/service/application/files/saas-local-static

[root@ saas-local-static]# ll

ls: cannot open directory .: Stale file handle

#先退出此目录就好了
其他说明
如果客户端 IP 不在该区间也想要挂载的话,可以设置 IP 区间更大或者设置为 * 即允许所有客户端挂载,例如:/home *(ro,sync,insecure,no_root_squash) 设置 /home 目录允许所有客户端只读挂载。
标题:搭建nfs挂载磁盘共享资源(nginx访问资源)
作者:yazong
地址:https://blog.llyweb.com/articles/2020/12/31/1609414661640.html